Markdown to InDesign, Simplified
The path from Word or Google Docs to InDesign is often fraught. Markdown offers writers and InDesigners a smoother path.
If a Microsoft Word user employs styles reliably and consistently, placing their Word doc into an InDesign publication can go smoothly. We congratulate the several people who are able to live this workflow. The rest of us wrangle erratically formatted or unformatted text.
But then, it’s not fair to ask writers to find formatting tools and apply styling. Their eyes and mnds are on the words, fingers forming les mots justes. Markdown is a way for a writer to easily add a few characters here and there so those doing layout can recognize a subheader from a sub-subheader from a block quote and format appropriately.
The writer should leave it to those of us doing the design to prettify their finely formed words. To understand how Markdown can help in that process, let’s review what markup is.
Markdown is Markup
In the days of “typewriters” (machines you can find in museums and trendy cafés), a writer would create a manuscript that someone later would “mark up,” indicating what a given chunk of text is, whether a header, a regular paragraph, or some phrase that should be emphasized. A typesetter would consult a style guide to know how each marked-up element should be formatted.
In modern times, we have other markup like HTML, a markup “code” that a web browser can interpret and format appropriately. But HTML is a bit hard to type. Consider the title of a manuscript. In HTML, we might write:
<h1>Pride and Prejudice</h1>
Try typing that quickly! Some “tags” on either side of an element can be verbose, like the <strong> tag, which usually yields bold type.
Markdown is Efficient and Succinct Markup
About two decades ago, John Gruber and Aaron Swartz invented Markdown, an easier-to-type markup that could be converted to HTML if desired. Using Markdown, that title becomes:
# Pride and Prejudice
Instead of surrounding a phrase in a <strong> tag, we use two underscores or asterisks (e.g., **this becomes bold later** as does __this phrase__).
This is wrist-saving and easy to learn and so more likely to be used by writers. That’s why it’s so popular. All that’s been missing is an easy way to convert this code to actual formatting in InDesign, the topic of this article.
The basic syntax of Markdown can be found here:
https://www.markdownguide.org/basic-syntax/. Much of it assumes conversion to HTML (the original intent of Markdown). Fortunately, those parts may be ignored for use in InDesign.
Since Markdown text isn’t formatted per se, it can be written in any text editor: Notepad, TextEdit, Scrivener, Ulysses, BBEdit, Word, Apple Pages, and many more. Some apps even provide a formatted preview. But the file that’s delivered to an InDesign user can really be just a plain text file (.TXT).
Styling Markdown in InDesign
There are many ways to convert Markdown to HTML. For other formats, we could use a computer’s command line (Terminal in macOS, for example) to use a utility known as PANDOC, which converts a huge number of formats to almost any other, including Word and InCopy documents. But the conversion from Markdown to InCopy sadly misses some common elements and the conversion to Word requires too much prep.
So, we’ll use an InDesign script and support files we made for you!
Get them here: https://luminousworks.com/resources
The download includes styles that the script applies to Markdown elements. Below, we’ll show you an easy way to map your own styles to ours after the script formats your text. The download contains:
A folder called FindChangeSupport containing a text file called FindChangeListMarkdown.txt
The script (called FindChangeByListMarkdown.jsx) that uses that text file to perform many Find/Change operations
An InDesign Snippet (called MarkdownStyles.idms) which houses the styles that are applied (provisionally) to Markdown content.
Add the Script to InDesign
Follow the steps below to add the script to InDesign’s Scripts panel. Put the Snippet (MarkdownStyles.idms) in a handy spot of your choosing.
Get InDesign’s Scripts panel (Window > Utilities > Scripts)
In that panel, note the User folder. Right-click on it (or Control+click on macOS), and choose Show in Finder (macOS) or Show in Explorer (Windows). Now you’re in the operating system viewing a folder called Scripts Panel (weirdly, not “User”).
Copy both the script (FindChangeByListMarkdown.jsx) and the FindChangeSupport folder then paste into that Scripts Panel folder (or drag and drop). Those items show up immediately in the Scripts panel!
Getting Markdown into InDesign
In InDesign, choose File > Place.
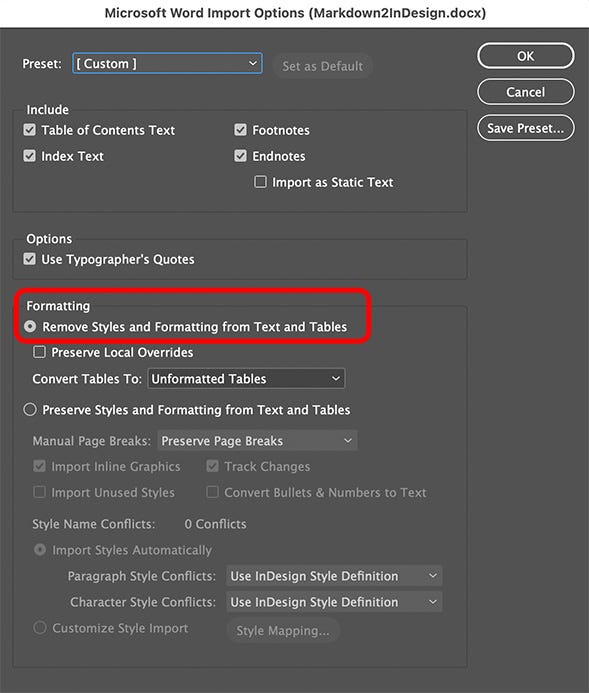
If you receive a Word doc with Markdown, tick the box to Show Import Options. In the options that follow, choose to “Remove Styles and Formatting.” Then, only the InDesign document’s default paragraph style will be applied to the text.

Add Styles for Markdown Content
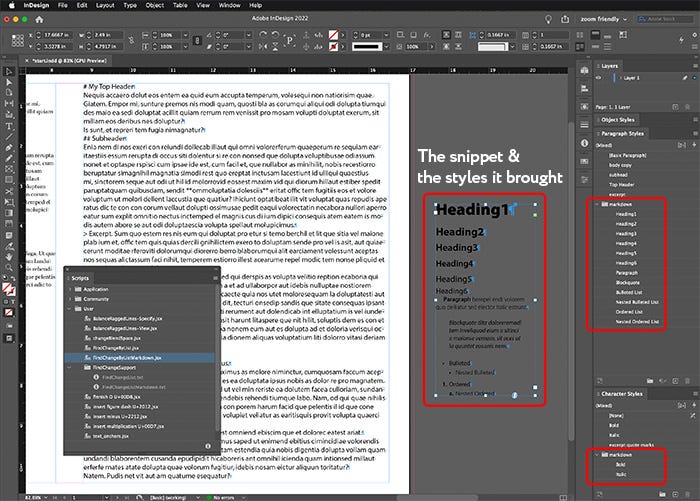
Once you’ve placed Markdown text in an InDesign document, you’ll need styles to decorate it. The InDesign Snippet MarkdownStyles.idms has ‘em. It’s a small text frame with styles applied to the text within. Either drag the snippet onto a blank area of your document or use File > Place, putting the text frame somewhere out of the way, then delete it. Yup, that’s right, it will deliver styles to your Paragraph and Character Styles panels which will stay after you delete the frame.

Save your InDesign document. If the script goes wrong, it will require a great many undos to remedy it. But if you save before running a script, you can use File > Revert as “undo.”
Run the Script
If there is other content in your document besides the Markdown text, you should select (highlight) the Markdown text to control the scope of the script. If it’s in its own InDesign story, you can simply put the text cursor somewhere in the story.
Then double-click FindChangeByListMarkdown.jsx in the Scripts panel to run it. That’s it! After you specify the “Search Range,” the text is styled.
Map Your Own Styles to Ours
If you’ve already got styles in the InDesign document to format this kind of content, it’s actually easy to replace our styles with yours and eliminate unneeded styles at the same time.
Make sure nothing is selected
Highlight the folder (Style Group) called “markdown” in the Paragraph Styles panel. Then click the small trashcan at the bottom of that panel.
You’ll be asked if you want to delete that Style Group. The answer is Yes.
For each of the styles that are actually used, such as the one called “Paragraph”, you’ll choose a replacement from styles that weren’t in the group being deleted. In the case of the style “Paragraph,” choose whatever you’re using for body text. Do NOT tick the box to Apply to All!
Do the same for the Character Styles “markdown” group, replacing our Bold and Italic with yours, if you wish.
If your Markdown text used only four Paragraph Styles from that group, you need choose only four substitutes. The unused styles will be deleted without comment.
Summary
Place Markdown text with no formatting
Add (then delete) the Snippet MarkdownStyles.idms
If other text is in the doc, select the Markdown text or put the text cursor in its story
Double-click the script FindChangeByListMarkdown.jsx
To replace our supplied styles with your own, delete each Style Group and choose a substitue style for each being deleted
With all the assets in place, this process really takes about a minute! Enjoy!


